We are going to use an Arduino Uno as an ISP to program the AT89S52 microcontroller. AT89 series from Atmel are compatible with Intel’s popular 8051 microcontroller.
In order to use Arduino as an ISP, we have to burn the ArduinoISP sketch to Arduino itself. Launch Arduino IDE and open the ArduinoISP sketch from:
File -> Examples -> 11.ArduinoISP -> ArduinoISP
We will be using pins 10-13 of the Arduino, instead of the ICSP header, so we need to define that into the ArduinoISP sketch before we build/upload it. Go to line 81 and uncomment the following:
#define USE_OLD_STYLE_WIRING
Save, Compile and Upload ArduinoISP to Arduino.
Next, we connect the Arduino Uno with the AT89S52 as follows.
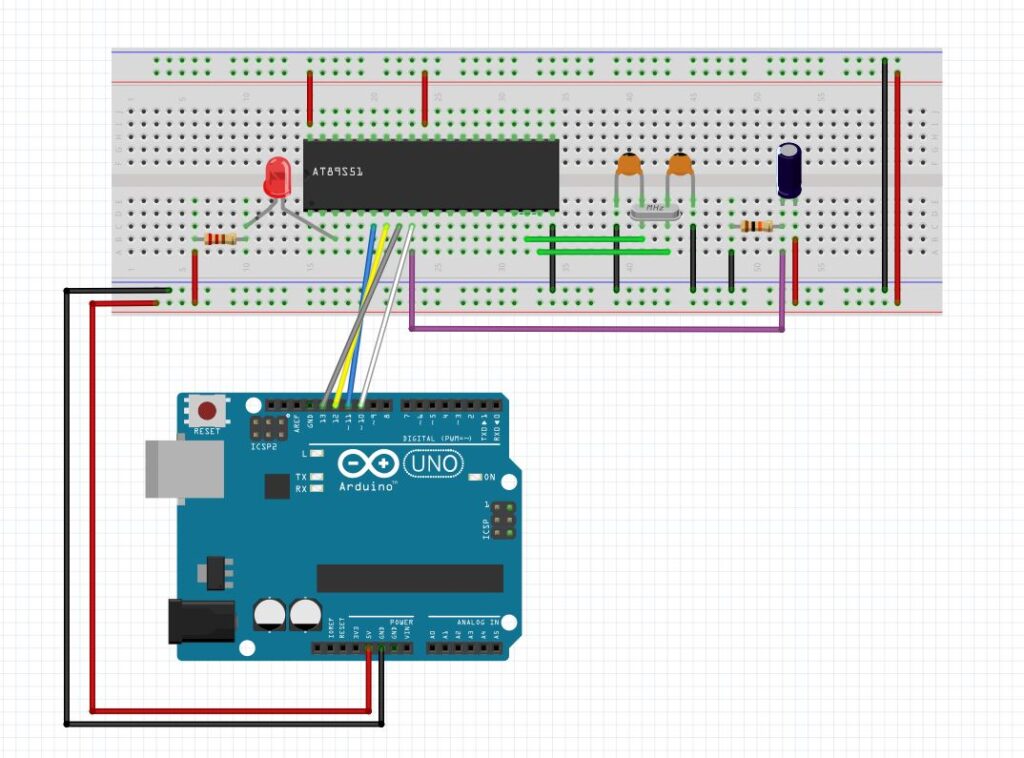
This is a list of the components I used in the above circuit:
- XTAL 11.0592MHz
- 2x 22pF capacitors for the crystal
- 10uF capacitor
- 220Ω resistor for the LED
- 10KΩ resistor
- red LED
I decided to use Keil uVision to build a basic program (blinky) for the AT89S52. You can use the open-source SDCC (C compiler for 8051/AT89SXX) as an alternative. For uVision to support the AT89 targets, I had to install the C51 Development Tools before anything.
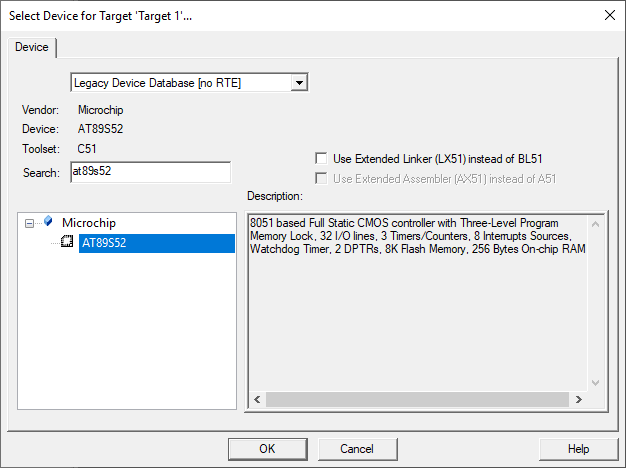
We can now start a new Keil uVision project targeting the AT89S52. Select Project -> New uVision Project. On the following dialog select the “AT89S52” target from the “Legacy Device Database” (which was added when we installed the C51 development tools).
Press “Yes” on the prompt asking to copy the STARTUP.A51 file into the project.
From the project tree on the left, select the “Source Group 1” item, right click on it and choose “Add new item”. Then select “C File” option and give it a name, e.g. blinky.c. Paste the following code into the newly created tab, which basically turns on and off the connected LED with an approximate delay of 1 second.
#include <REGX52.h>

// This gives ~1s delay for a 11.0592MHz xtal, using timer0
void delay()
{
    int i;
    for(i=0; i<1000; i++) {
        TMOD = 0x01;    // Timer0 mode1
        TH0 = 0xFC;      //initial value for 1ms
        TL0 = 0x66;
        TR0 = 1;      // timer start
        while(TF0==0);  // check overflow condition
        TR0 = 0;     // Stop Timer
        TF0 = 0;    // Clear flag
    }
}

void main()
{
    P1_2 = 0x00;    // all pins of PORT2 declared as output
    while(1) {
        P1_2 = 1; // pin P1_2 high
        delay();
        P1_2 = 0; // pin P1_2 low
        delay();
    }
 }
Before we build our program, make sure that you have selected the correct crystal frequency (11.0592MHz in our case) in the project’s target options (Target tab), as well as to also generate the hex file (“Create HEX File” checkbox) in the Output tab.
After you build the above source code, you should end up with a hex file. You can get mine here. We are gonna feed that hex file to AVRDUDE utility that will program our AT89S52 microcontroller through the ArduinoISP. Get the latest avrdude, or use the one supplied with Arduino IDE.
Since AVRDUDE does not support AT89S52 target by default, we will have to add the following lines at the end of our avrdude.conf file:
part
    id               = "89s52";
    desc             = "AT89S52";
    stk500_devcode   = 0xE1;
    signature        = 0x1e 0x52 0x06;
    chip_erase_delay = 500000;
    reset            = dedicated;
    pgm_enable       = "1 0 1 0  1 1 0 0    0 1 0 1  0 0 1 1",
                       "x x x x  x x x x    x x x x  x x x x";

    chip_erase       = "1 0 1 0  1 1 0 0    1 0 0 x  x x x x",
                       "x x x x  x x x x    x x x x  x x x x";

    memory "flash"
        size            = 8192 ;             # bytes
        read            = "0 0 1 0 0 0 0 0  x x x a12 a11 a10 a9 a8",
                          "a7 a6 a5 a4 a3 a2 a1 a0 o o o o o o o o";
        write           = "0 1 0 0 0 0 0 0 x x x a12 a11 a10 a9 a8",
                          "a7 a6 a5 a4 a3 a2 a1 a0 i i i i i i i i";
        ;
    memory "signature"
        size            = 3;
        read            = "0 0 1 0 1 0 0 0  0 0 0 0 0 0 a1 a0",
                          "0 0 0 0 0 0 0 0  o o o o o o  o  o";
        ;
  ;
part parent "89s52"
    id = "89s51";
    desc = "AT89S51";
    signature = 0x1e 0x51 0x06;
    memory "flash"
        size            = 4096 ;             # bytes
        read            = "0 0 1 0 0 0 0 0  x x x x a11 a10 a9 a8",
                          "a7 a6 a5 a4 a3 a2 a1 a0 o o o o o o o o";
        write           = "0 1 0 0 0 0 0 0 x x x x a11 a10 a9 a8",
                          "a7 a6 a5 a4 a3 a2 a1 a0 i i i i i i i i";
      ;
    ;
You can get my avrdude configuration file here.
Having all the pieces together, we can finally burn our program onto AT89S52.
>avrdude.exe -c avrisp -p at89s52 -C my-avrdude.conf -P com3 -b 19200 -U flash:w:blinky.hex:i

 avrdude.exe: AVR device initialized and ready to accept instructions
 Reading | ################################################## | 100% 0.03s
 avrdude.exe: Device signature = 0x1e5206 (probably 89s52)
 avrdude.exe: NOTE: "flash" memory has been specified, an erase cycle will be performed
              To disable this feature, specify the -D option.
 avrdude.exe: erasing chip
 avrdude.exe: reading input file "blinky.hex"
 avrdude.exe: writing flash (2108 bytes):
 Writing | ################################################## | 100% 1.80s
 avrdude.exe: 2108 bytes of flash written
 avrdude.exe: verifying flash memory against blinky.hex:
 avrdude.exe: load data flash data from input file blinky.hex:
 avrdude.exe: input file blinky.hex contains 2108 bytes
 avrdude.exe: reading on-chip flash data:
 Reading | ################################################## | 100% 0.80s
 avrdude.exe: verifying …
 avrdude.exe: 2108 bytes of flash verified
 avrdude.exe: safemode: Fuses OK (E:FF, H:FF, L:FF)
 avrdude.exe done.  Thank you.
I am trying to develop a circuit using tyhe at89s52 I dont have any knodwledge on how to accomplist could youi help
Please help:I have an issue.
C:\Users\wounder>”C:\Program Files (x86)\Arduino\hardware\tools\avr\bin\avrdude.exe” -C C:/AVR8051.conf -c stk500v1 -P COM8 -p 89s52 -b 19200 -U flash:w:”C:\Users\wounder\Desktop\AT89S52-TEST\Objects\at899.hex”:a
avrdude.exe: AVR device initialized and ready to accept instructions
Reading | ################################################## | 100% 0.20s
avrdude.exe: Device signature = 0x1e5206 (probably 89s52)
avrdude.exe: NOTE: “flash” memory has been specified, an erase cycle will be performed
To disable this feature, specify the -D option.
avrdude.exe: erasing chip
avrdude.exe: reading input file “C:\Users\wounder\Desktop\AT89S52-TEST\Objects\at899.hex”
avrdude.exe: input file C:\Users\wounder\Desktop\AT89S52-TEST\Objects\at899.hex auto detected as Intel Hex
avrdude.exe: writing flash (58 bytes):
Writing | | 0% 0.00s ***failed;
Writing | ## | 3% 0.22s ***failed;
Writing | ### | 5% 0.35s ***failed;
Writing | ### | 6% 0.49s ***failed;
Writing | #### | 8% 0.60s ***failed;
Writing | ##### | 10% 0.74s ***failed;
Writing | ###### | 12% 0.89s ***failed;
Writing | ####### | 13% 1.02s ***failed;
Writing | ######## | 15% 1.17s ***failed;
Writing | ######### | 17% 1.31s ***failed;
Writing | ######### | 18% 1.45s ***failed;
Writing | ########## | 20% 1.56s ***failed;
Writing | ########### | 22% 1.70s ***failed;
Writing | ############ | 24% 1.84s ***failed;
Writing | ############# | 25% 1.98s ***failed;
Writing | ############## | 27% 2.12s ***failed;
Writing | ############### | 29% 2.27s ***failed;
Writing | ################ | 31% 2.40s ***failed;
Writing | ################ | 32% 2.55s ***failed;
Writing | ################# | 34% 2.68s ***failed;
Writing | ################## | 36% 2.83s ***failed;
Writing | ################### | 37% 2.95s ***failed;
Writing | #################### | 39% 3.08s ***failed;
Writing | ##################### | 41% 3.20s ***failed;
Writing | ###################### | 43% 3.35s ***failed;
Writing | ####################### | 46% 3.51s ***failed;
Writing | ######################## | 48% 3.65s ***failed;
Writing | ######################### | 50% 3.80s ***failed;
Writing | ########################## | 51% 3.93s ***failed;
Writing | ########################### | 53% 4.07s ***failed;
Writing | ############################ | 55% 4.22s ***failed;
Writing | ############################ | 56% 4.35s ***failed;
Writing | ############################# | 58% 4.49s ***failed;
Writing | ############################## | 60% 4.60s ***failed;
Writing | ############################### | 62% 4.74s ***failed;
Writing | ################################ | 63% 4.88s ***failed;
Writing | ################################# | 65% 5.03s ***failed;
Writing | ################################## | 67% 5.16s ***failed;
Writing | ################################## | 68% 5.30s ***failed;
Writing | ################################### | 70% 5.44s ***failed;
Writing | #################################### | 72% 5.57s ***failed;
Writing | ##################################### | 74% 5.71s ***failed;
Writing | ###################################### | 75% 5.85s ***failed;
Writing | ####################################### | 77% 5.99s ***failed;
Writing | ######################################### | 81% 6.20s ***failed;
Writing | ######################################### | 82% 6.34s ***failed;
Writing | ########################################## | 84% 6.47s ***failed;
Writing | ########################################### | 86% 6.58s ***failed;
Writing | ############################################ | 87% 6.70s ***failed;
Writing | ############################################# | 89% 6.84s ***failed;
Writing | ############################################## | 91% 6.98s ***failed;
Writing | ############################################### | 93% 7.12s ***failed;
Writing | ############################################### | 94% 7.26s ***failed;
Writing | ################################################ | 96% 7.41s ***failed;
Writing | ################################################# | 98% 7.54s ***failed;
Writing | ################################################## | 100% 7.69s
avrdude.exe: 58 bytes of flash written
avrdude.exe: verifying flash memory against C:\Users\wounder\Desktop\AT89S52-TEST\Objects\at899.hex:
avrdude.exe: load data flash data from input file C:\Users\wounder\Desktop\AT89S52-TEST\Objects\at899.hex:
avrdude.exe: input file C:\Users\wounder\Desktop\AT89S52-TEST\Objects\at899.hex auto detected as Intel Hex
avrdude.exe: input file C:\Users\wounder\Desktop\AT89S52-TEST\Objects\at899.hex contains 58 bytes
avrdude.exe: reading on-chip flash data:
Reading | ################################################## | 100% 5.88s
avrdude.exe: verifying …
avrdude.exe: verification error, first mismatch at byte 0x0000
0x00 != 0x02
avrdude.exe: verification error; content mismatch
avrdude.exe: safemode: Fuses OK (E:FF, H:FF, L:FF)
avrdude.exe done. Thank you.
Looks like something went wrong. It’s uncommon to fail at the wrtiting stage. Usually it fails when reading the ID. Maybe something is wrong with your config file or the programmer.